Scared that data might be accidentally deleted? You can lock your cells to protect them.
You can easily spend hours working on a spreadsheet. After getting all your data in one place, validating it, and implementing the right formulas, the last thing you want to do is accidentally delete anything. Learning how to lock cells in Excel will put your mind at ease.
When you lock a cell, you prevent anyone who is viewing the spreadsheet from accidentally deleting or changing the data. Not only is this great for protecting your complicated formulas, but it can also save you the headache of having to hit the "undo" button repeatedly to try to get your data back.
What does the Excel lock cells option do?
Say you have an important workbook that you have spent a long time working on and need to send it to a colleague so they can add a final touch. Send it unprotected, and you risk them accidentally deleting or changing your contributions as they make their own.
If you protect the entire workbook, no one will be able to change anything—unless you allow certain cells to remain unlocked. You can then send a partially editable workbook to your colleague. When they're done, you can go back in and lock the cells that they worked on, protecting the entire workbook without standing in the way of collaboration.
If you want to lock all the cells in your worksheet, the easiest way to do it is to simply turn on worksheet protection, which locks all cells by default. You only need to worry about the lock/unlock function if there are specific cells you want to leave unlocked.
How to lock all cells in an Excel worksheet
The simplest way to lock cells in your workbook is to protect the workbook, which locks all cells by default.
1. Go to the Review tab and click Protect Sheet.

Select "Protect Sheet" from the Review Tab[1]
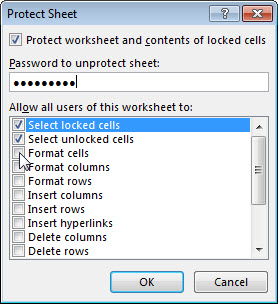
2. In the Protect Sheet window, you have the option to select a password if you want to give other users/collaborators the ability to unprotect the sheet. You can also set user capabilities/permissions from this window.

The "Protect Sheet" window gives you password and user permission options[1]
3. Click OK and the sheet will be protected.
How to lock specific cells in an Excel worksheet
If you don't want to lock all the cells in your workbook, there's a simple way to specify your preferences. It's important to note that because worksheet protection locks all cells by default, you have to specify the cells you do not want to lock, rather than the cells you want to lock.
1. Select the cells that you do not want to lock. Right-click on your selection, and click Format Cells.

Once you select the cells you don't want to lock, right-click and select "Format Cells"[2]
2. In the dialog box that opens, go to the Protection tab. Uncheck Locked.

Select the "Locked" option[1]
3. Then, navigate to the Review tab and select Protect Sheet. All cells will lock, except the cells you selected.
How to unprotect a worksheet in Excel
If you have previously locked cells in Excel and protected your worksheet, you can turn off the protection by following these steps.
1. Follow this menu selection chain: File > Info > Protect > Unprotect Sheet. Alternatively, you can navigate to the Review tab, select Changes, and then select Unprotect Sheet.

When your sheet or workbook is protected, the protect option changes to unprotect[1]
2. If there is a password securing the worksheet, enter the password in the Unprotect Sheet dialog box and click OK.
Considerations when locking cells in Excel
Protected worksheets are not secure. Locks and protection are not security features in Excel. While these tools can prevent accidental editing, they don't make your workbook more secure. Any user can go into the settings to unlock cells or turn off protection unless you add a password.
Don't forget your password. When using a password to protect your workbook, choose a strong one and make sure that you remember it. If you forget your password, Microsoft cannot retrieve it.
You can hide cells and/or lock them. If you want to make your worksheet easier on the eyes, consider learning how to hide rows or columns and then lock them so they can't be unhidden when users are viewing your sheet. This isn't intended as a security feature, but it can simplify the look of your worksheets.
Do more with your spreadsheets
With this handy trick up your sleeve, you can easily lock cells to help protect your valuable data and formulas. Of course, there are plenty of other ways to get more out of your spreadsheets.
If you're trying to streamline your work day or go beyond Excel, check out other spreadsheet programs, data entry software, and productivity tools.
